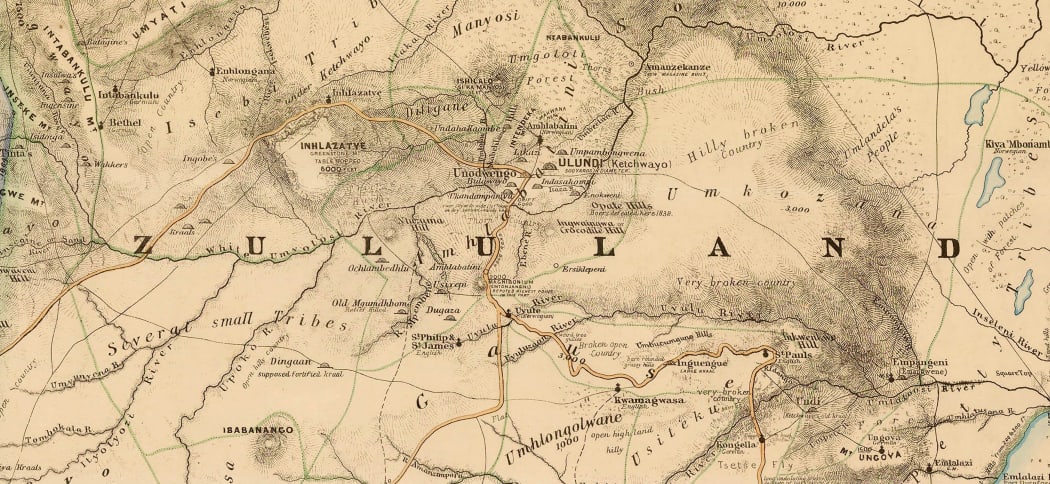
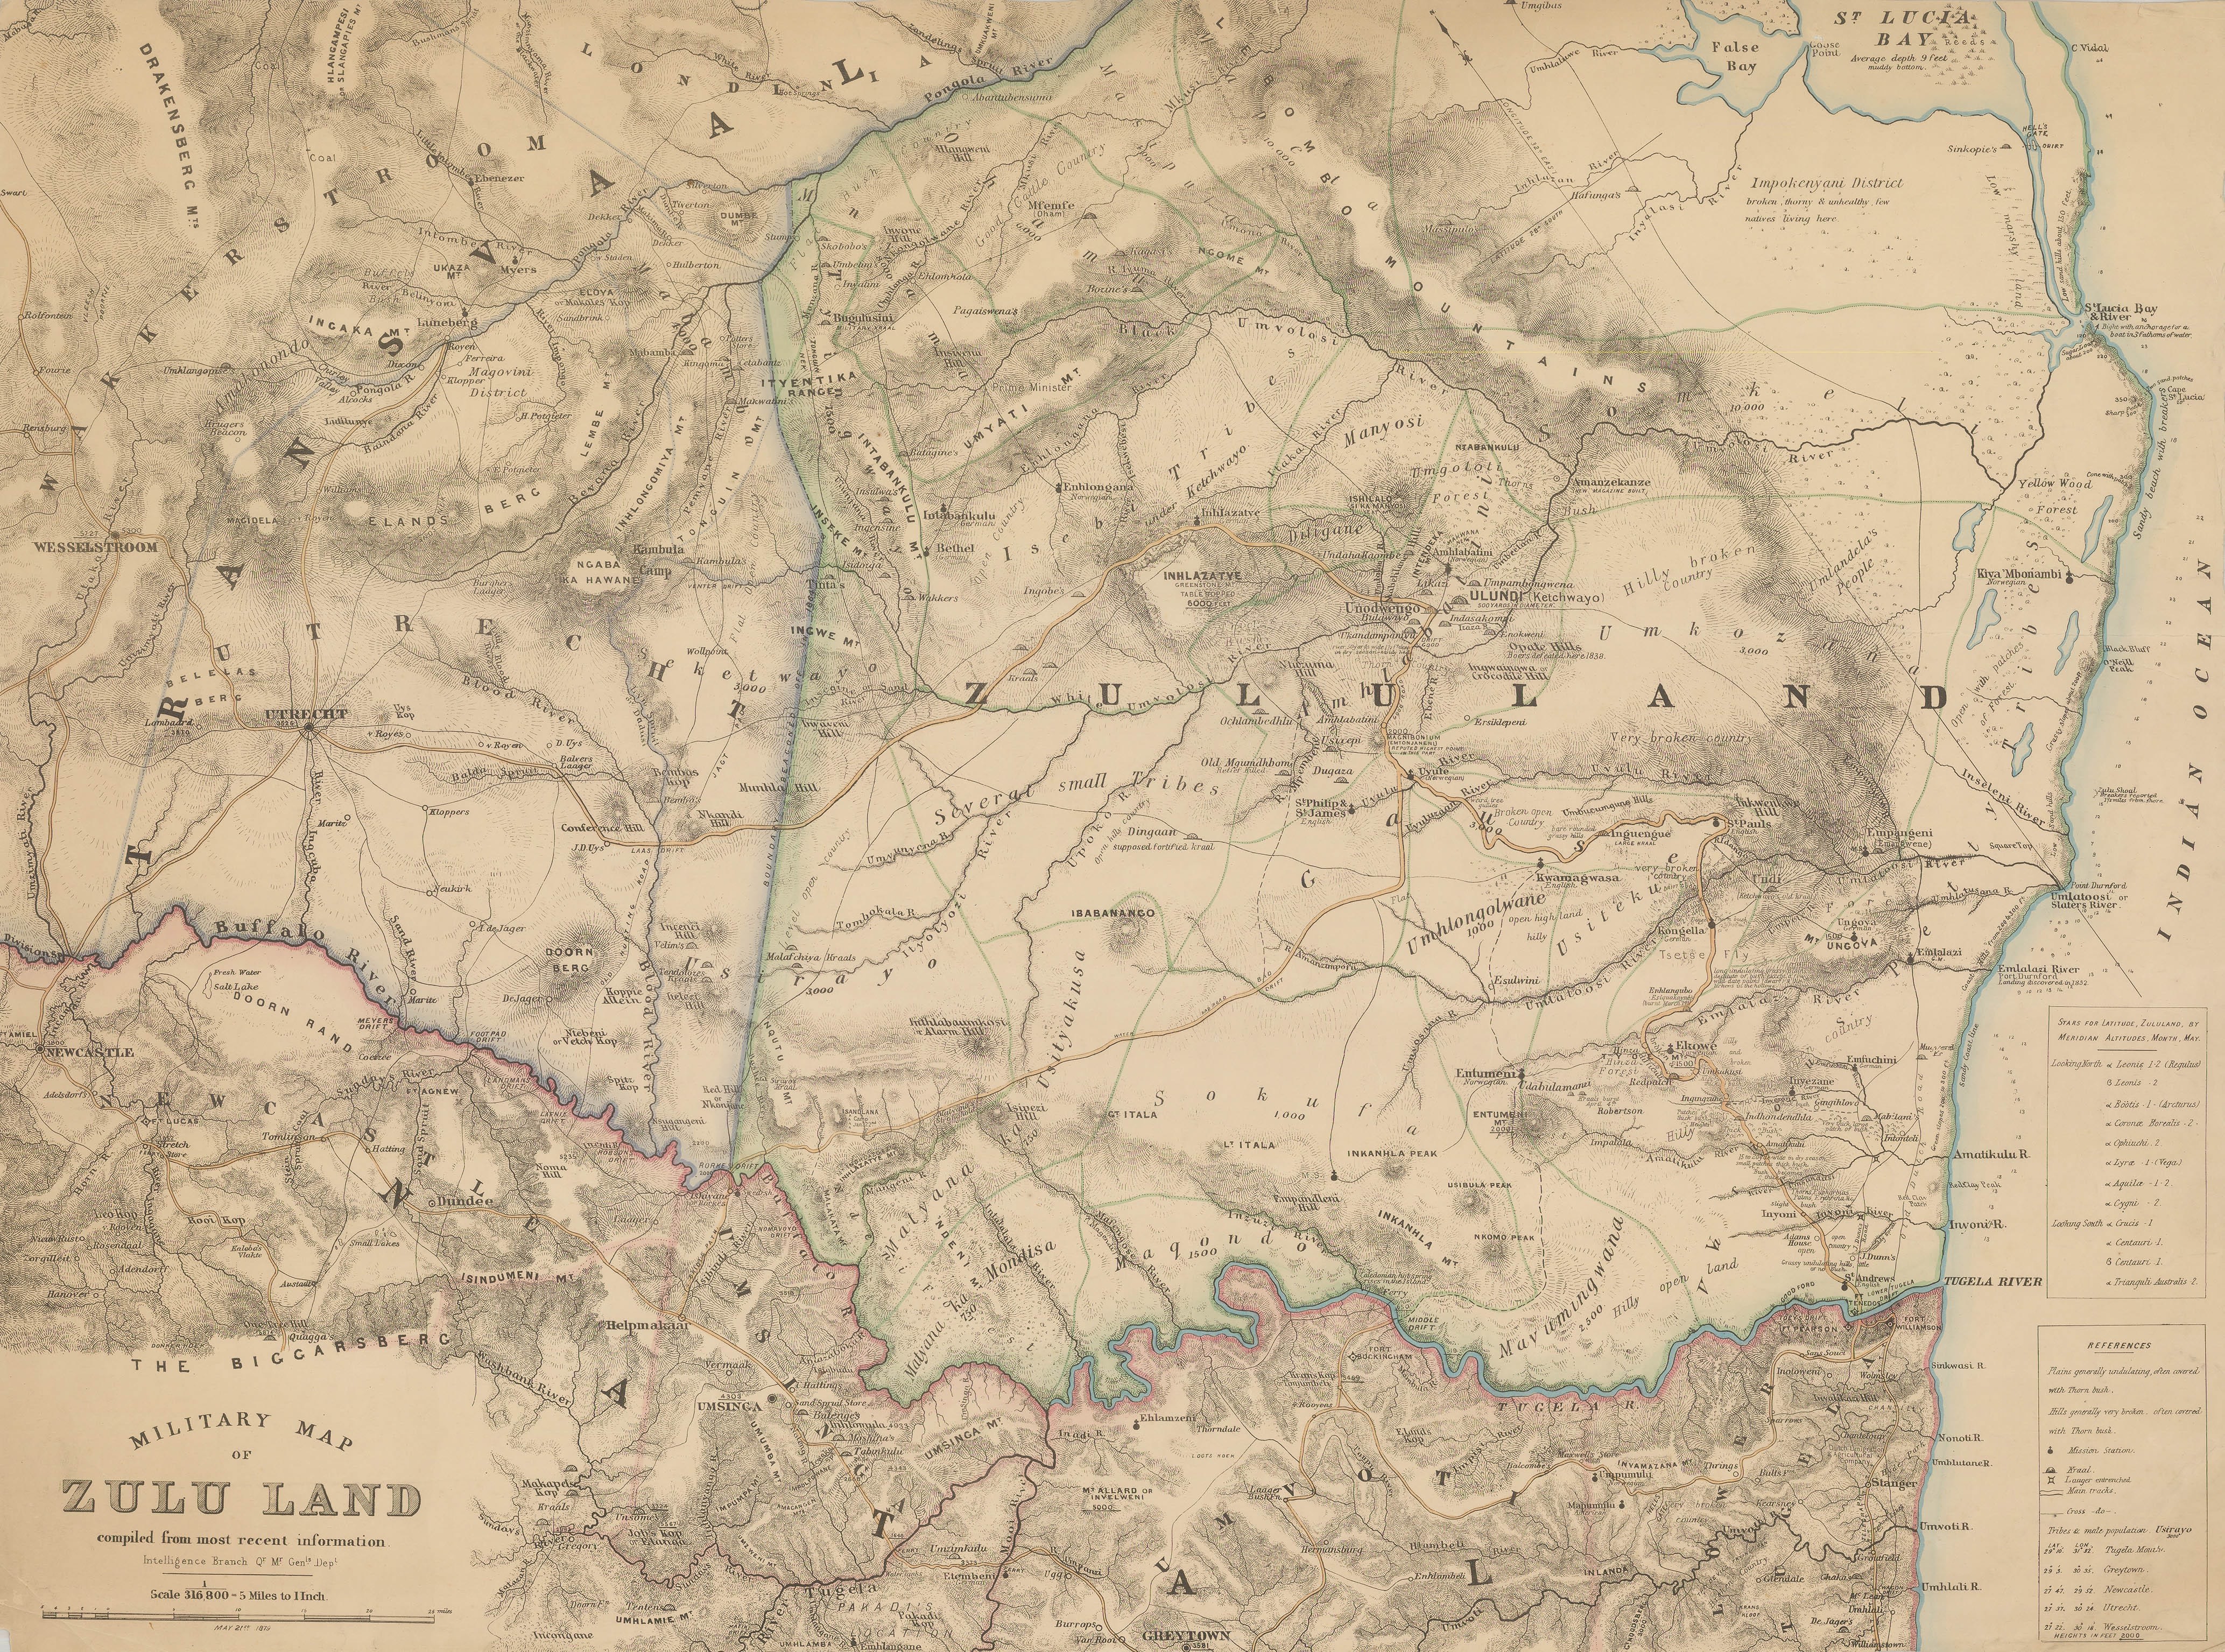
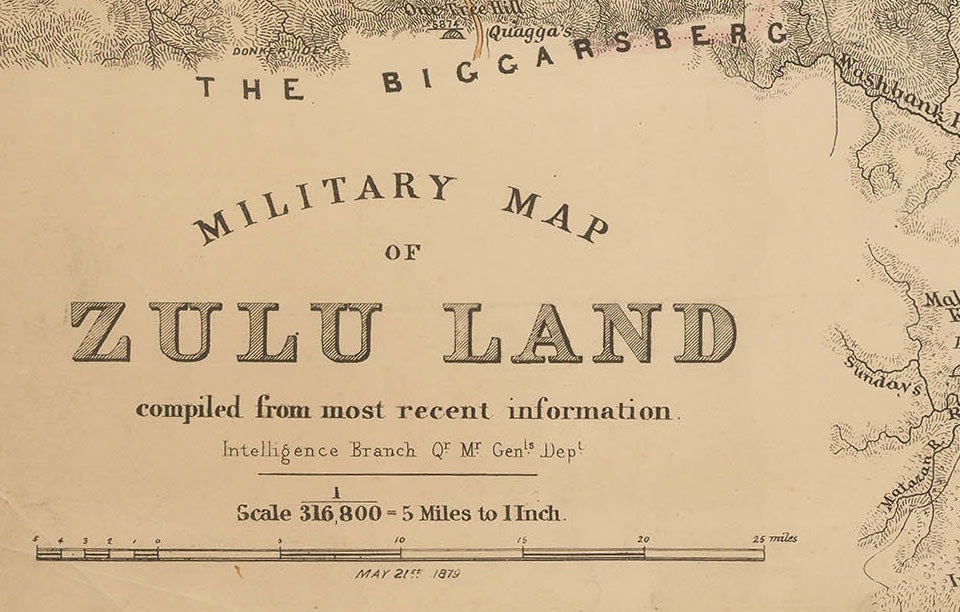
Published during the Anglo-Zulu War, this superb map is a rare surviving 19th century campaign map that was actually used by officers in the field during the war. Printed by the Intelligence Branch of the Quartermaster General’s Department of the British Army and dated 21st May 1879, it was prepared shortly after the battles of Isandlwana and Rorke’s Drift, both of which took place on 22nd January but before the concluding battle of Ulundi on 4th June.
The Cause of War
The powerful and militaristic Zulu nation under the rule of King Cetshwayo was officially allied to the British but was regarded by certain colonial administrators as a barrier to further expansion of the British Empire in Africa. Sir Henry Bartle Frere, the High Commissioner for Southern Africa, on his own initiative and without the approval of the British Government, issued an ultimatum to Cetshwayo knowing that its harsh terms would be impossible for the King to accept which in turn would ostensibly legitimise a British invasion of Zululand in the eyes of the public at home.
The powerful and militaristic Zulu nation under the rule of King Cetshwayo was officially allied to the British but was regarded by certain colonial administrators as a barrier to further expansion of the British Empire in Africa. Sir Henry Bartle Frere, the High Commissioner for Southern Africa, on his own initiative and without the approval of the British Government, issued an ultimatum to Cetshwayo knowing that its harsh terms would be impossible for the King to accept which in turn would ostensibly legitimise a British invasion of Zululand in the eyes of the public at home.
The British Commander
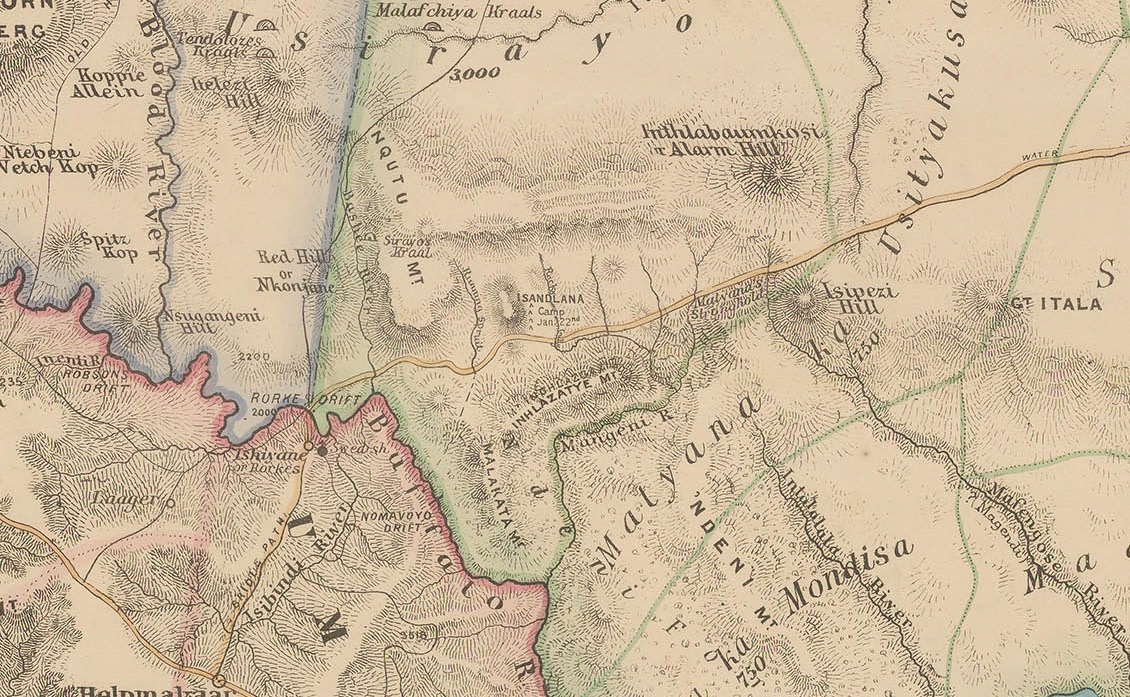
The military commander, Lord Chelmsford, arrogantly confident that a well-trained and armed British force could defeat any number of native warriors, recklessly split his invasion force into three separate columns. The main column under Chelmsford’s direct command crossed the Buffalo River into Zululand at Rorke’s Drift and established a temporary camp eleven miles away at Isandlwana.
The military commander, Lord Chelmsford, arrogantly confident that a well-trained and armed British force could defeat any number of native warriors, recklessly split his invasion force into three separate columns. The main column under Chelmsford’s direct command crossed the Buffalo River into Zululand at Rorke’s Drift and established a temporary camp eleven miles away at Isandlwana.
Chelmsford once more split his force, leaving a third of his men (approximately 1,400) behind at Isandlwana along with 130 wagons, 2000 draught animals and the bulk of the supplies, while he took the remainder to chase the elusive Zulu army which he believed to be between him and Ulundi, Cetshwayo’s capital.
Battle of Isandlwana
The main force had barely got eleven miles from the camp when they received the first messages that the camp was under attack, only for Chelmsford to dismiss the report as an irrelevant misunderstandings of the real situation. In fact the camp was under siege from the main Zulu army of over 20,000 warriors and was in the process of being enveloped in Zulu’s favourite tactic, the “Horns of the Buffalo”.
The main force had barely got eleven miles from the camp when they received the first messages that the camp was under attack, only for Chelmsford to dismiss the report as an irrelevant misunderstandings of the real situation. In fact the camp was under siege from the main Zulu army of over 20,000 warriors and was in the process of being enveloped in Zulu’s favourite tactic, the “Horns of the Buffalo”.
The British forces, armed with Martini-Henry rifles capable of firing twelve shots a minute, formed an extended firing line. The ferocious fire-power of the defensive line kept the Zulu armed with assegais, the traditional three foot stabbing spear, at bay for over an hour but as the rate of fire exceeded the ability to supply ammunition the guns slowly fell silent allowing the Zulu to close to within stabbing range. The British, with fixed bayonets, were forced to retreat in squares back towards the camp. After two hours of frantic combat and extraordinary displays of bravery by both sides, the British and their native allies were overwhelmed by sheer weight of numbers and slaughtered virtually to a man. In a final curious twist the bloody climax of the battle took place during a total eclipse of the sun.
The few survivors of the massacre, principally those on horse-back, attempted to escape back to Rorke’s Drift but found that the right “Horn of the Buffalo” had circled round behind them and cut them off from safety. Forced to flee across rough terrain, most of them were speared from their saddles by the swift running Zulu while others perished in the raging waters of the Buffalo River.
When Lord Chelmsford, finally aware of the danger to the camp, arrived back after dark, he found a scene of utter devastation. While the Zulu had removed their own dead and wounded, 1,300 men (900 Europeans and 400 from the Natal Native Contingent) lay where they had fallen. The majority of the corpses had been stripped of their jackets and ritually disembowelled to “release their spirits” as dictated by Zulu custom. Chelmsford marched his relief force away from the battlefield before daybreak in order to spare them the full horror of the scene.
Rorke’s Drift
Meanwhile the “Loins of the Buffalo”, the 4,000 strong Zulu reserve, frustrated about not being involved in the victory of Isandlwana, launched an unauthorised attack on the lightly held mission station of Rorke’s Drift.
Meanwhile the “Loins of the Buffalo”, the 4,000 strong Zulu reserve, frustrated about not being involved in the victory of Isandlwana, launched an unauthorised attack on the lightly held mission station of Rorke’s Drift.
Rorke’s Drift consisted of two large stone buildings, a solidly built storeroom and the original mission house, now used as an army hospital. Lieutenants John Chard and Gonville Bromhead commanded a force of about 150 men included 30 hospital cases, several of whom were bed-ridden.
Having been given notice of the impending Zulu attack by survivors fleeing Isandlwana, Chard, a Royal Engineer, hurriedly constructed defensive ramparts between the two buildings using the extensive supply of mealie bags (corncobs) and biscuit boxes from the stores.
For nearly eleven hours, Chard and Bromhead’s tiny force, held off the numerically overwhelming Zulu army as it launched a series of relentless if uncoordinated attacks. Eventually at dawn the exhausted Zulu called off the assault, having suffered between 400-800 dead. The defenders sustained 17 dead and 15 seriously wounded.
Lord Chelmsford, coming straight for the blood-soaked battlefield of Isandlwana and fearing the worst, was astonished to see the Union Jack still flying from the roof of Rorke’s Drift and was greeted with a weak but heartfelt cheer from the shattered defenders.
Chelmsford and his significantly diminished force, demoralised and now short of supplies, were forced back to their main bases in Natal to await reinforcements and resupply.

Pearson’s Column
Meanwhile the two other columns of Chelmsford’s divided command had also got into difficulties. The right hand column, commanded by Colonel Charles Pearson, advancing from the coast, crossed the Tugela River and began marching towards Cetchwayo’s capital of Ulundi.
On 22nd January, the same day as Isandlwana and Rorke’s Drift, a 6,000 strong Zulu Impi (Army) ambushed the column as it crossed the Ineyzane River. The Zulu charge was halted by the judicious deployment of the British force’s 7-pounder field guns and its one Gatling gun. The Zulu retired from the field leaving about 1,000 dead compared to 137 British.
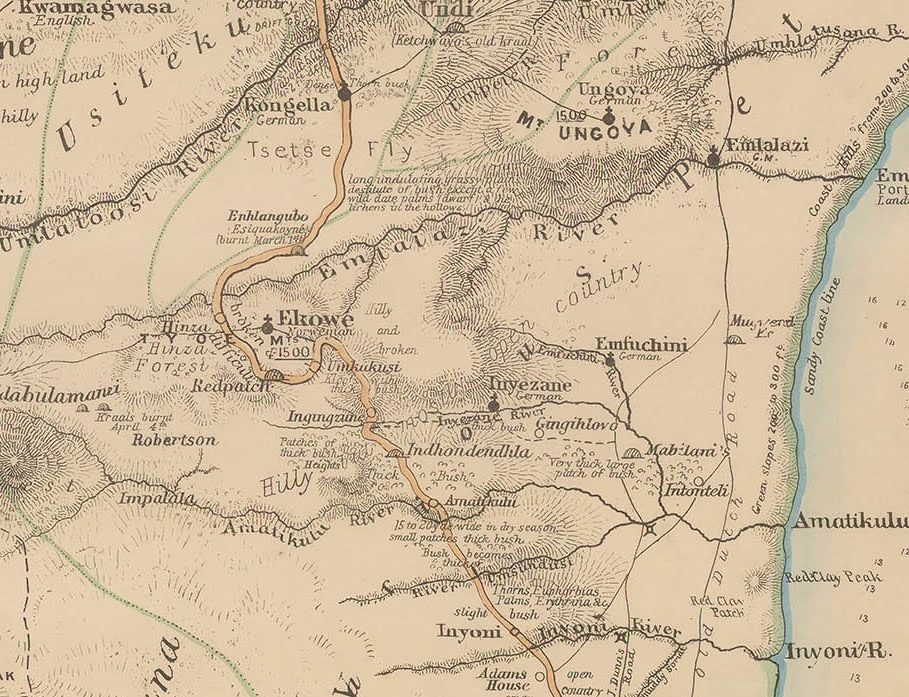
The column continued on unhindered until it reached Eshowe [“Ekowe”] where Pearson built a fortified camp and sent back runners to Chelmsford requesting reinforcements. On 26th January a message came back from Chelmsford which, while not mentioning the disaster of Isandlwana directly, informed Pearson that all previous orders were cancelled and that he was to take whatever actions he saw fit to preserve his column and that he might soon be facing the entire Zulu army. Reluctantly deciding it would be more dangerous to be caught in the open, Pearson continued to fortify the camp and trusted that he would be relieved before his supplies were exhausted before the beginning of April.
Wood’s Column
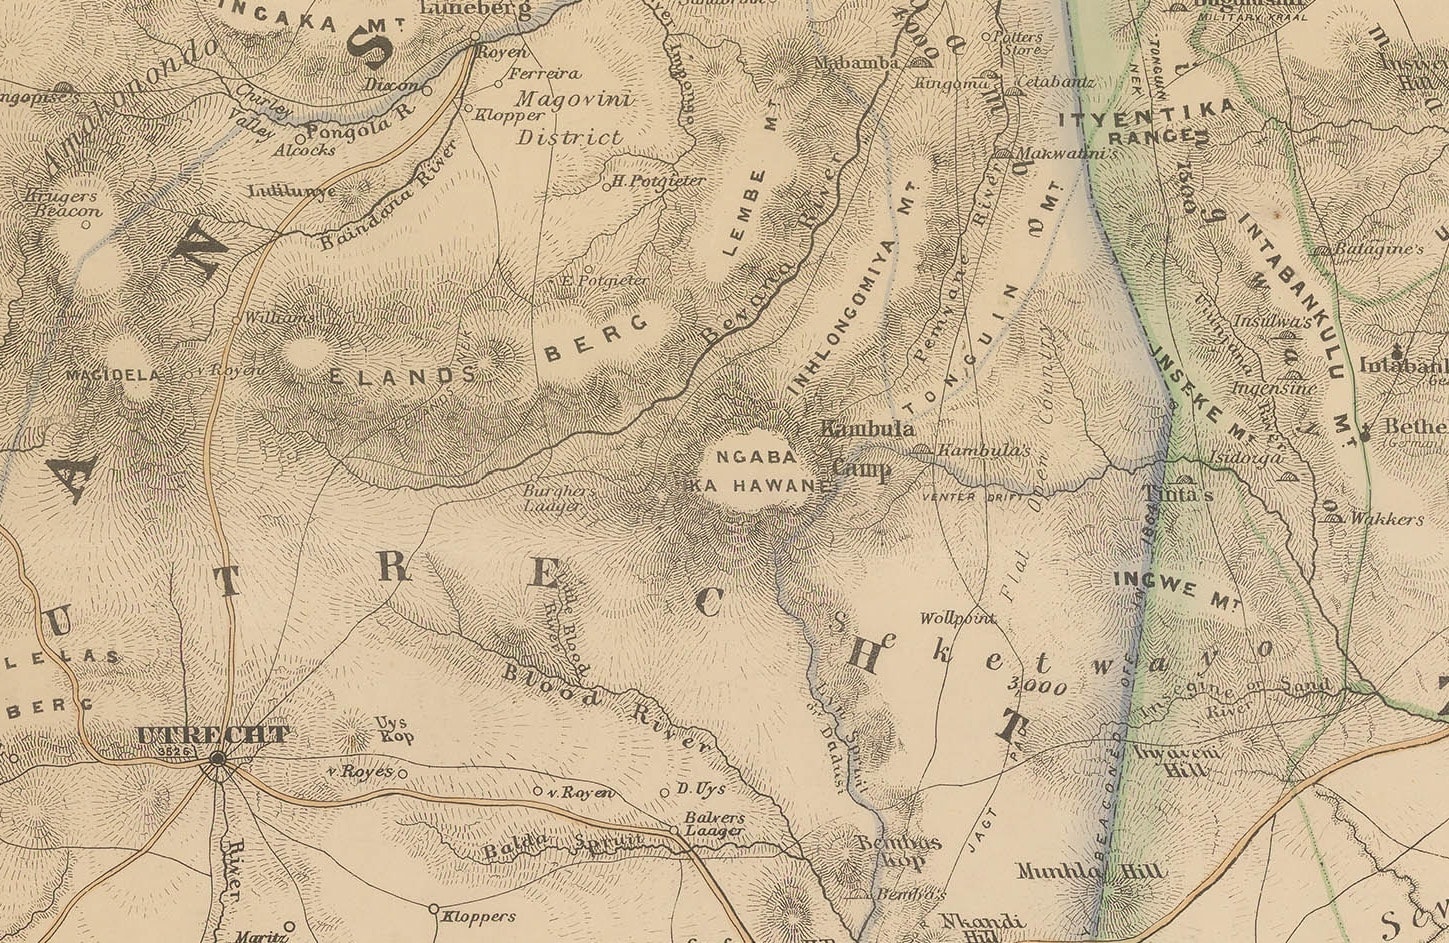
In the meantime the left hand column under Colonel Evelyn Wood marched out from Utrecht and entered north-western Zululand. After some initial success Wood, on receiving the news of the catastrophe of Isandlwana, prudently withdrew his forces to the fortified camp of Kambula which he further strengthened by laagering (forming into a defensive circle) his wagons.
In the meantime the left hand column under Colonel Evelyn Wood marched out from Utrecht and entered north-western Zululand. After some initial success Wood, on receiving the news of the catastrophe of Isandlwana, prudently withdrew his forces to the fortified camp of Kambula which he further strengthened by laagering (forming into a defensive circle) his wagons.
Towards the end of March, Chelmsford managed to gather together sufficient troops to attempt the relief of Pearson’s column besieged at Eshowe. He ordered Wood to stage a distraction in the north-west to attract the attention of the Zulu main army while he made a dash for Eshowe.
Wood ordered an attack on Hlobane, just inside the border of Zululand, which although ultimately routed with heavy loss, succeeded in its principal aim of provoking the main Zulu army to attack Kambula. This was despite Cetshwayo’s standing order not to attack fortified or laagered British troops.
Battle of Kambula
On 29th March the 20,000 strong main Zulu Impi, containing many veterans of Isandlwana, attacked the ramparts and laagered wagons of the camp of Kambula. Notwithstanding their unwavering courage in unleashing charge after charge, the relentless British Martini-Henry volley fire and skilful use of the four 7-pounder guns devastated the Zulu ranks. Eventually the beaten Zulu retired having suffered an estimated 1,000-2,000 deaths compared to a British casualty bill of 29.
Chelmsford’s relief force reached Eshowe on 3rd April. The now combined force marched back over the borders into the Transvaal.
This was the situation facing Lord Chelmsford when this extraordinary map was printed by the Army’s Intelligence Branch on 21st of May. In effect he was no closer to his goal of defeating Cetshwayo than he had been back in January 1779 and the calamitous start of the campaign.

This finely detailed map with its attractive outline hand-colouring is likely to have been printed on some form of portable lithographic press back at the Army HQ in Natal. It reveals with superb clarity exactly what was known to the British combatants of the area of the campaign at this time. A note on the verso of the map reads “Zululand map used by the Staff during the war”. The most significant area of the map for Chelmsford’s staff planning the advance would naturally be the area around Cetshwayo’s capital Ulundi. Here we see notes as to tribal alliances and number of warriors, as well tactical aspects such as “Dingaan, supposed fortified kraal” and “Amanzekanze, new magazine built”. Significant topographical features important to an advancing army are recorded such “very broken country”, “open high land, hilly” along with dangers such as “Tsetse Fly”. It is much more detailed than Stanford’s Map of Zululand published on 4th March in London.
The second invasion of Zululand began in a leisurely way at the beginning of June and only developed a sense of urgency when Chelmsford heard that General Garnett Wolseley was on his way out to replace him.
The Battle of Ulundi
On 3th July Chelmsford’s force of over 6,000 men, augmented by a battery of Gatling guns stood before the Royal Kraal at Ulundi. Despite increasingly desperate attempts by Cetshwayo to negotiate and orders not to engage from Wolseley, Chelmsford was determined to retrieve his military reputation before he was relieved of his command and attacked the following day.
First using the cavalry to goad the Zulu into the attack, the whole British force slowly advanced on Ulundi in the form a one vast impenetrable hollow square. The Zulu repeatedly charged the square from all sides with extraordinary bravery but the intensity of the British rifle fire, allied with the Gatling guns, meant that virtually no warrior got to within 30 yards of the British ranks.
In just over half an hour the Zulu army, arguably the most powerful indigenous sub-Saharan military power in history, had been effectively broken bringing to an end the Anglo-Zulu War.
For more information about this map and other maps and engravings on the subject of the Anglo-Zulu War, please email maps@themaphouse.com.